The last weeks saw us setting up the tooling and writing a contract (and testing it). It’s definitely time to deploy a contract "for real" and run it.
This is the 3rd post in the Starting Ethereum focus series.Other posts include:
- Starting with Ethereum - Setup
- Starting with Ethereum - Writing a contract
- Starting with Ethereum - Deploying and running a contract (this post)
- Starting with Ethereum - Smart contracts
- Starting with Ethereum - Industrialization
Using the GUI
Thanks to the Ethereum wallet, deploying and running a contract is trivial.
- In the wallet, go to the menu:Contracts tab.
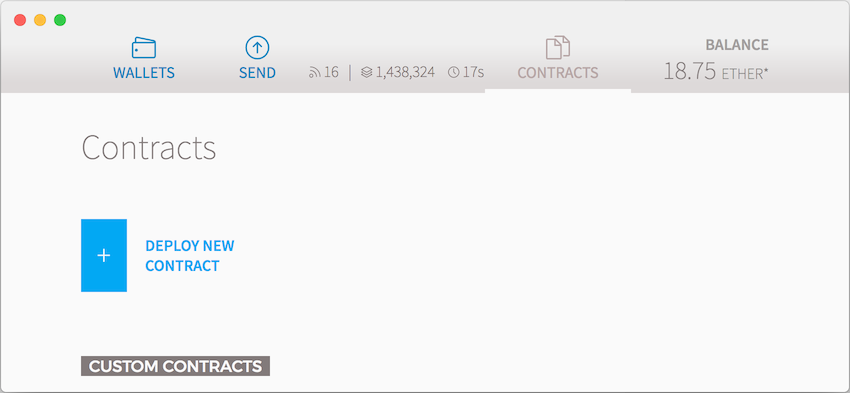
- Click on Deploy New Contract.
- Paste the Solidity code.
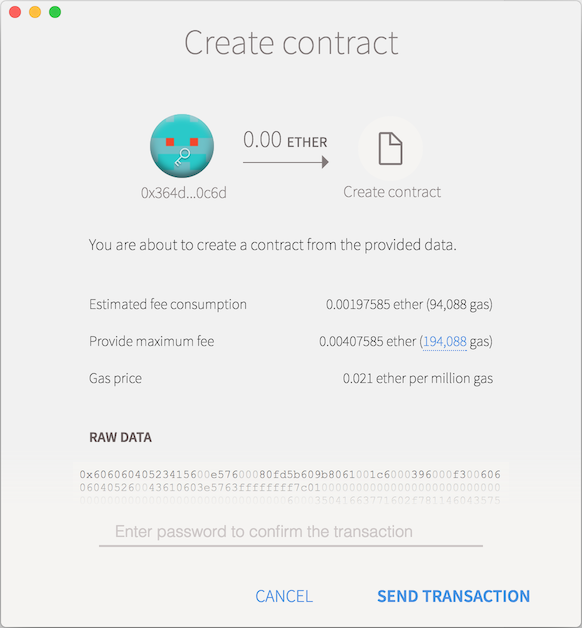 Deploying a contract on the blockchain costs ether (and time)!
As opposed to traditional deployments on your company’s Tomcat or AWS (or whatever), deploying on Ethereum is not free.
By deploying a contract, you change the state of the blockchain. So you pay miners to do it for you. And the more you pay, the more incentive you give to potential miners to do it early: it’s like an auction.
- Enter your wallet password to validate the deployment.
- At some point, the contract should have been created.
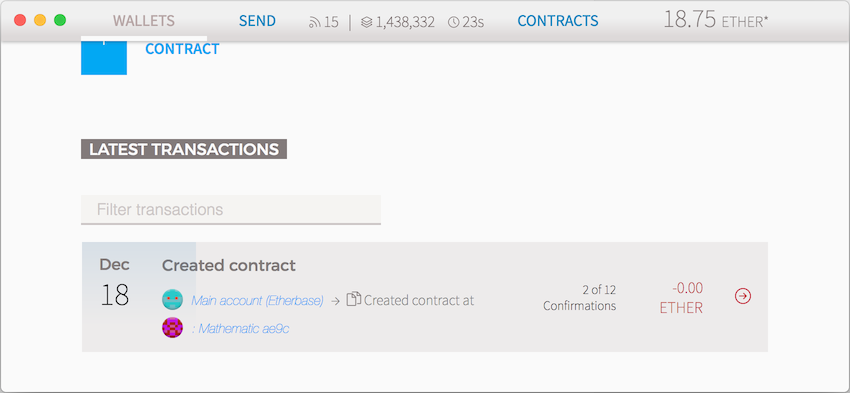
- Click on the newly created contract.
- The contract signature appears.
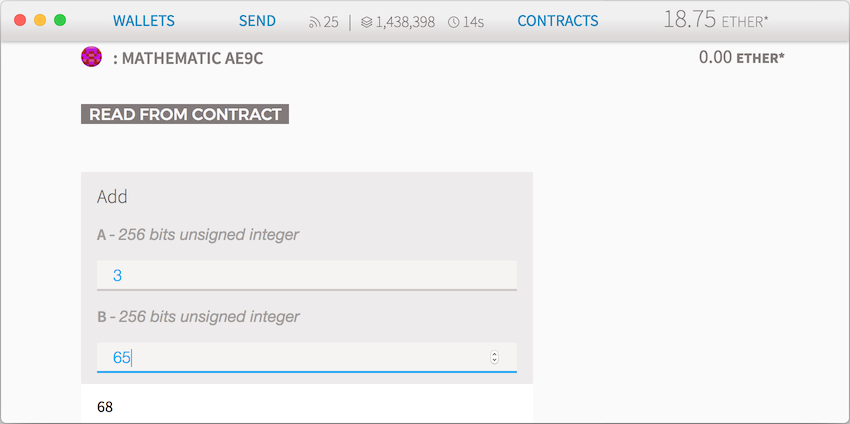
- Fill in arguments, and watch as your contract gets executed.
Congrats, you’ve run and deployed your first contract!
Using the command-line
While the wallet allows to deploy and run code, the developer’s way is the command-line. Let’s see how to reproduce the above steps with it.
Installation
The first step is to install an Ethereum command-line client.
There’s one official such client for Go, C++ and Python.
geth is the client for Go, and has no dependencies.
Let’s install it via Homebrew:
brew tap ethereum/ethereum
brew install ethereum
Remember that Ethereum is a network made out of nodes.
geth is able to run such a node locally.
It also has a lot of other capabilities, including mining.
To run the node, many parameters are available, such as the network itself, the directory where data is stored, etc.
To easily capture them, be sure to have the wallet launched, and run a ps -ef | grep geth.
~/Library/Application Support/Ethereum Wallet/binaries/Geth/unpacked/geth --rinkeby --syncmode fast \
                                                                          --cache 1024 --ipcpath ~/Library/Ethereum/geth.ipc
Yep, that’s right.
The Ethereum wallet package has a geth binary and runs it underneath.
Just copy-paste the the parameters list, and the new standalone get with them.
geth --rinkeby --syncmode fast --cache 1024 --ipcpath ~/Library/Ethereum/geth.ipcAt this point, the log should display synch data such as:
Imported new chain segment blocks=1 txs=10 mgas=0.655 elapsed=7.089ms mgasps=92.422 number=1441983 hash=d8656c…759081
To interact with the local node, geth also offers a JavaScript console.
In another tab, run get attach.
The output is the following:
Welcome to the Geth JavaScript console!

instance: Geth/v1.7.3-stable/darwin-amd64/go1.9.2
coinbase: 0x364d73b70f429a9a8d3964b54334dd9a4f7c0c6d
at block: 1441934 (Tue, 19 Dec 2017 14:13:09 CET)
 datadir: ~/Library/Ethereum/rinkeby
 modules: admin:1.0 clique:1.0 debug:1.0 eth:1.0 miner:1.0 net:1.0 personal:1.0 rpc:1.0 txpool:1.0 web3:1.0

>
Running geth and get attach commands in different tabs is equivalent to simply run geth console (and the list of parameters).
|
The console offers a whole API dedicated to interacting with the Ethereum blockchain.
Since the Wallet runs geth underneath, one can run get attach and it will attach to the underlying process.
|
Simple manipulations
To start with, let’s use the console to print out all configured accounts:
web3.eth.accounts;["0x364d73b70f429a9a8d3964b54334dd9a4f7c0c6d"]
There’s only one so far. Now let’s ask for the balance:
web3.eth.getBalance(web3.eth.accounts[0]);18748024152000000000
Compiling the contract
Compiling the Solidity source is done outside of the console, with the solc command (installed along geth with Homebrew).
solc --abi --bin --gas -o /tmp Mathematic.solThe above will compile the Mathematic.sol file in the current folder to binary format - as well as the ABI interface, in the /tmp folder and output the estimated gas cost of running it (more later on gas).
======= Mathematics.sol:Mathematic =======
Gas estimation:
construction:
   82 + 37200 = 37282
external:
   add(uint256,uint256):	265
|
While the binary is obviously what will get deployed, the Application Binary Interface (ABI) is the interface through which to interact with the binary. The ABI is a JSON array, and contains method signatures of the contract.
— Solidity documention
https://solidity.readthedocs.io/en/develop/abi-spec.html |
Deploying the contract
Deploying requires more advanced usage of the web3 API:
var myAccount = web3.eth.accounts[0];                                                          (1)
var addContract = web3.eth.contract(<content/of/ABI>);                                         (2)
var binary = '0x<content/of/binary>';                                                          (3)
var estimatedGas = web3.eth.estimateGas({data: binary});                                       (4)
var addContractInstance = addContract.new({data: binary, from: myAccount, gas: estimatedGas}); (5)| 1 | Reference to the desired account. If you have multiple accounts, you can directly use your account’s public key. |
| 2 | Reference to the contract to deploy, sourced from its interface. |
| 3 | Binary content of the contract.
Notice that for the current version of the client, it should be prefixed with 0x. |
| 4 | Estimation of the gas used to deploy. Deploying on the blockchain costs something, because miners need to expand CPU and time to write your contract on the blockchain. Gas is an intermediary unit that translates into Ether. |
| 5 | Deploys the new contract |
Chances are, running the above snippet will output the following:
authentication needed: password or unlock
It’s obvious that your account is secured, so that nobody can just wire funds to themselves. Before doing anything fancy with Ethereum, one should just authenticate. This is achieved with:
web3.personal.unlockAccount(myAccount, '<password>', 10000);|
The 3rd parameter is the time that the account will stay unlocked. For the "production" network, it’s advised to have very short periods. For Rinkeby, using a longer time is not an issue. |
Repeating the above procedure will now work.
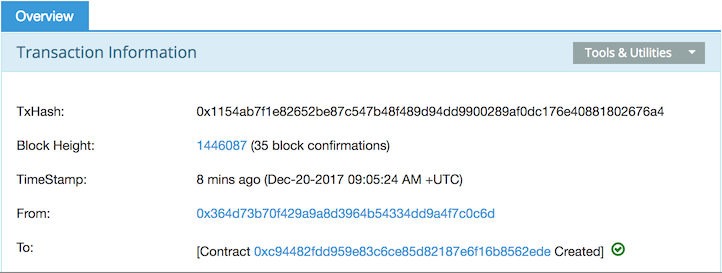
Also, a log should have appear in the main geth tab:
INFO [12-20|10:05:21] Submitted contract creation
    fullhash=0x1154ab7f1e82652be87c547b48f489d94dd9900289af0dc176e40881802676a4
    contract=0xc94482fDd959E83C6CE85D82187E6F16b8562EDe
Running the contract
Running the contract is as easy as calling the defined method on the deployed contract reference:
addContractInstance.add(6,6);12
In general, however, contracts are deployed once and ran multiple times. To get the reference of a contract deployed in a previous session (or a third-party contract):
- Instantiate an object with its ABI interface.
- Fill its address.
var anotherContract = web3.eth.contract(<content/of/ABI>);
var anotherContractInstance = anotherContract.at('0x<address'>);
The address of a contract deployed by us is available:
- In the
addressproperty of the deployed contract, e.g.:addContractInstance.address; - In the deployment log, under the
contractattribute
|
Recovering the contract address
If you lost all references - for whatever reason, all hope is not lost. It’s still possible to recover the contract address.
|