

Recently, GitHub allowed users to customize the appearance of their profile page. This is different from GitHub Pages: it allows to add extra content to one’s GitHub profile.
Since that feature is available, a lot of developers have decided to customize their page. I think this is fun, so I also wanted to do the same, in my own way.
I wanted to describe it, so fellow developers can take inspiration. Since the whole process is a bit long, I’ve split this post in two parts. This part is about creating the build script, while the second is about automating its execution.
Starting on the right foot
A lot of developers have written on how to customize one’s profile. It consists of two steps:
- Create a repository with the same name as your GitHub account
- Add a
READMEat the root. TheREADMEcan be of any type that GitHub renders (Markdown or Asciidoctor)
From that point on, when you go to your profile’s page, GitHub will render the README at the top.
To give you a taste, here’s the final preview:
Here’s a summary of my requirements:
- The
READMEMUST display the following data:- Bio
- Last 3 blog posts
- Next 5 planned talks
- Last YouTube recording
- The
READMEmust not duplicate data from any existing data source - The
READMEmust should update at regular intervals - The
READMEtemplate must use the Asciidoctor format - The system must be free to use
- The system must be an occasion to learn new things
- The system must not require too much learning time
With that in mind, the design I came up with is straightforward: a template with placeholders filled by the response of different HTTP calls.
Laying out the work
With the previous requirements list, I chose to use the following components:
- GitHub Actions
- Kotlin Scripting
- Freemarker
Kotlin Scripting
A lot of developers have used Python to write the script that updates their profile page. It’s not an option for me, as it would require too much investment on my part. On the other side, I’m quite familiar with Kotlin. But I did known nothing about Kotlin scripting.
The first hurdle I encountered was to understand there are two ways to use Kotlin in scripts:
- the official but still-experimental Kotlin Scripting
- and the community-led kscript effort.
While the latter seems to be more mature, I chose the former because it’s backed by JetBrains, the company behind Kotlin.
Here are a couple of tips to help one start:
- Install Kotlin Scripting with SDKMAN.
- Suffix the script’s name with
main.ktse.g.myscript.main.kts - The script’s shebang is
#!/usr/bin/env kotlin - To use dependencies:
- Configure the required Maven repository(ies) i.e.
@file:Repository("https://jcenter.bintray.com")for Bintray - Use
@file:DependsOnto add the dependency e.g.@file:DependsOn("org.json:json:20200518")
- Configure the required Maven repository(ies) i.e.
The script should:
- Make the calls to each data source to get the relevant data
- Load the
READMEtemplate - Fill in the template placeholders with the relevant bits of data
- Write the
README.adocfile with the completed template
Templating
Initially, I thought I would read the template from a document, and fill placeholders using Kotlin’s String interpolation.
I learned that interpolation runs at compile-time, not at run-time.
Then, I searched for a JVM-based templating engine. I set my eyes on Apache Freemarker. It’s Open Source, easy to set up, and gets the job done.
Basically, Freemarker defines a simple template syntax with placeholders, loops, and conditionals.
The code loads the template, evaluates it against a provided model, and writes the result back into a Writer.
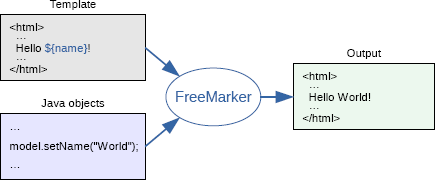
The associated code looks like that:
val template = Configuration(Configuration.VERSION_2_3_29)                (1)
  .apply {
    setDirectoryForTemplateLoading(File("."))
    defaultEncoding = "UTF-8"
    templateExceptionHandler = TemplateExceptionHandler.RETHROW_HANDLER
    logTemplateExceptions = false
    wrapUncheckedExceptions = true
    fallbackOnNullLoopVariable = false
  }.getTemplate("template.adoc")

val root = mapOf(                                                         (2)
    "bio" to bio,
    "posts" to posts,
    "talks" to talks,
    "videoId" to videoId
)

template.process(root, FileWriter("README.adoc")) (3)| 1 | Create the Freemarker configuration |
| 2 | Create the model as a map |
| 3 | Merge the model with the template, and write down the result in the README.adoc file |
If you’re more visual, here’s a partial view of class diagram:

HTTP calls
In the past, I’ve used the Fuel HTTP client. The API takes advantage of the Kotlin language, offers several syntax flavors, and has a solid community behind it.
But when I started to use it, I faced an issue. In a traditional Maven project, the workaround would be to add the dependency in the available version, and thus override the default one. Yet, it doesn’t work with Kotlin Scripting - it’s not possible to override versions in the same way.
I had to pivot. I chose OkHttp as an alternative. The benefit of OkHttp is its fluent API.
Here’s a simplified view of the class diagram:

The code looks something like this:
val client = OkHttpClient()                 (1)

val request = Request.Builder()
  .url("https://blog.frankel.ch/feed.xml")
  .addHeader("User-Agent", "Mozilla/5.0")   (2)
  .build()                                  (3)

val content = client
  .newCall(request)
  .execute()                                (4)
  .body
?.string() (5)| 1 | The client is stateless, you can reuse it across calls |
| 2 | A proxy protects some sites by checking that requests come from "proper" browsers |
| 3 | Create the request object |
| 4 | Execute the call, it returns a Response object |
| 5 | Get the response’s content as a String, if it exists |
Reading data sources
All data I want to display already exist in one form or another. Here are the desired data, their sources and their respective format:
| Data | Source | Format |
|---|---|---|
Bio |
Blog GitLab repository* |
YAML |
Blog posts |
XML |
|
Planned talks |
Blog GitLab repository* |
HTML |
Talks description |
YAML |
|
YouTube recording |
JSON |
|
* The GitLab repository is private |
||
The common parts
Across all calls to the different data sources, the sequence is always the same:
- Create the request object
- Execute the call
- Transform the response results into the required object e.g. a string or a list of objects
For that reason, I created an utility function to take care of the common parts in the sequence:
fun <T> execute(builder: Request.Builder,           (1)
                extractor: (String?) -> T): T {     (2)
  val body = client.newCall(builder.build())
    .execute()
    .body
    ?.string()
  return extractor(body)
}| 1 | The request parameter, including the URL, is different for each data source |
| 2 | The extractor function takes care of the transform |
A lazy property defines each data source. Then, each fills the corresponding key-value pair in the Freemarker model map:
val bio: String by lazy { }
val posts: List<Post> by lazy { }
val talks: List<Talk> by lazy { }
val videoId: String by lazy { }

val root = mapOf(
  "bio" to bio,
  "posts" to posts,
  "talks" to talks,
  "videoId" to videoId
)
Bio
My private GitLab repository hosts a YAML data file that contains the bio. To parse YAML, I use the popular SnakeYAML library.
The returned YAML looks like:
main:
    firstName: Nicolas
    lastName: Fränkel
    bio: >
      blah blah
The corresponding extractor function is straightforward:
val extractBio = { body: String? ->
  val authors = Yaml().load<Map<String, Any>>(body)     (1)
  val main = authors["main"] as Map<*, *>               (2)
  main["bio"] as String                                 (3)
}| 1 | Loads the YAML as a map |
| 2 | Get the main key as another map |
| 3 | Get the bio key as a string |
Next talks
The talks are also read from a YAML data file from the same private repo. Hence, the code is pretty similar from the previous section. Yet, there’s a twist: each talk’s description is quite long, and I’d prefer something more concise.
All my talks are already set on Papercall. A talk has different characteristics, including a short "elevator pitch". I could pre-load all talks in a map, with the title as the key, and the "elevator pitch" as the value. But it works only if the title matches letter-by-letter, case included. This is hard to guarantee, because I (or the conference) sometimes customize the title.
The chosen approach is a bit different. The map is still pre-loaded, but the flow is akin to:
IFthe title matches,RETURNthe pitchELSEFOReach title, compute the Jaro Winkler distance. For that, use theJaroWinklerSimilarityclass from Apache Commons Text.IFnone is higher than a set threshold e.g.0.5, there’s no corresponding pitchRETURNthe description from the YAML.ELSE RETURNthe pitch with the highest similarity
Since Papercall offers no API, I read the HTML page, and parse it using JSoup. This is admittedly fragile, but I found no other way. In the worst case, the build breaks, GitHub sends a notification, and doesn’t update the profile.
Latest blog posts
The RSS feed contains all blog posts. RSS is XML, and XML parsing is ages-old in Java.
The required steps are:
- Load the RSS over the web
- Deserialize the returned XML to a DOM
Documentusing the out-of-the-box Java API - Extract the latest 3 blog post nodes to a
NodeListusing XPath - Transform the
NodeListobject to aList<Post>
A data class models the Post entity:
data class Post(val published: LocalDate,
                val title: String,
                val link: String,
                val excerpt: String)
One hurdle I faced is that the excerpt of each talk might contain HTML entities.
I use StringEscapeUtils.unescapeHtml4() from Apache Commons Text to cope with that.
Latest recording
Recordings of my talks are available on a manually-curated Youtube playlist. YouTube offers an API. One needs to activate - and configure - it on the Google Cloud Console. The API is free up to 10k calls per day. That is more than enough for this use-case.
The exact API to call is the Playlist Items. One needs to call it with the following parameters:
| Parameter | Description | Value |
|---|---|---|
|
Unique ID of the playlist |
|
|
Highest number of items returned in the result set |
|
|
Specifies a comma-separated list of one or more |
|
The returned JSON looks like the following:
{
  "kind": "youtube#playlistItemListResponse",
  "etag": "mHM75p3nyuatm7RG27LD-EajROI",
  "nextPageToken": "CAEQAA",
  "items": [
    {
      "kind": "youtube#playlistItem",
      "etag": "AK-w0AZhAbntxHmSsp8X0_tLG-k",
      "id": "UEwwRXVCdUtLLXMxRUwtSzNva3BZd1IwUVpiQVBSVm1FRy4xRDJGOTc4RkUxMzUwMUFG",
      "snippet": {
        "publishedAt": "2020-08-07T17:58:15Z",
        "channelId": "UC5wHWZfEjZChkgVzg2jnbhQ",
        "title": "Shorten all URLs: Quarkus, Kotlin, Hazelcast and GraalVM",
        "description": "Nicolas Frankel Developer Advocate, Hazelcast...",
        "thumbnails": {
          "default": {
            "url": "https://i.ytimg.com/vi/rJ9erRb5Fg8/default.jpg",
            "width": 120,
            "height": 90
          },
        "channelTitle": "Nicolas Frankel",
        "playlistId": "PL0EuBuKK-s1EL-K3okpYwR0QZbAPRVmEG",
        "position": 0,
        "resourceId": {
          "kind": "youtube#video",
          "videoId": "rJ9erRb5Fg8"                                   (1)
        }
      }
    }
  ],
  "pageInfo": {
    "totalResults": 113,
    "resultsPerPage": 1
  }
}| 1 | The extractor function needs to return this ID |
Between OkHttp plus the generic JSON-parsing library, and the specific YouTube one, I decided to favor the former over the latter. IMHO, there’s no benefit in using Google objects in this context.
Conclusion
GitHub profiles are a cool way to customize your GitHub landing page.
In this post, we set up a script that gets bits and pieces from different data sources, and write a custom README.
In opposite to most existing projects, I showed how to do this with a JVM-based stack.
You can read the resulting script on GitHub. In the next post, I will explain how create the build pipeline using GitHub actions.
The complete source code for this post can be found on GitHub.