
In this article, I will provide you with the documentation to easily use the Flamingo framework and more precisely, its ribbon widget.
Introduction
Never say that Microsoft never innovates: in Office, it introduced an interesting concept, the ribbon band.
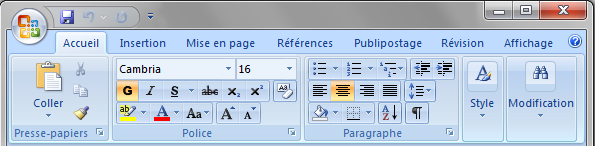
The ribbon band is a toolbar of sort. But whereas toolbars are fixed, ribbons layout can change according to the width they display. If you have such an application, just play with it for a few seconds and you will see the magic happens.
Recent versions of Swing do not have such widgets. However, I found the Flamingo project on java.net. Examples made with Flamingo look awfully similar to Office.
Trying to use Flamingo for the first time is no small feat since there’s no documentation on the Web, apart from Javadocs and the source for a test application. The following is what I understood since I began my trial and error journey.
The basics
Semantics
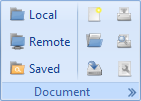
- the ribbon is the large bar on the screenshot above. There can be only a single ribbon for a frame
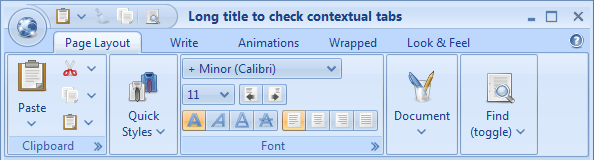
- a task is a tabbed group of one or more band. On the screenshot, tasks are Page Layout, Write, Animations and so on
- a band is a group of one or more widgets. On the screenshot, bands are Clipboard, Quick Styles, Font and so on
Underlying concepts
The core difference between buttons in a toolbar and band in a ribbon bar is that bands are resizable. For examples, these are the steps for displaying the Document band, in regard to both its relative width and the ribbon width.
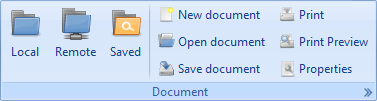
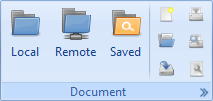

The last step is known as the iconified state. When you click on the button, it displays the entire band as a popup.
Your first ribbon
Setup
In order to use the Flamingo framework, the first step is to download it. If you’re using Maven, tough luck! I didn’t find Flamingo in central nor java.net repositories. So download it anyway and install it manually in your local (or enterprise) repository. For information, I choosed the net.java.dev.flamingo:flamingo location.
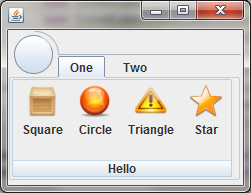
The frame
If you are starting from scratch, you’re lucky.
Just inherit from JRibbonFrame: the method getRibbon() will provide you a reference to the ribbon instance.
From there, you will be able to add tasks to it.
However, chances are you probably already have your own frame hierachy.
In this case, you have to instantiate a JRibbon and add it on the NORTH location of your BorderLayout-ed frame.
In both cases, the result should be something akin to that:
Adding a task
Tasks represent logical band grouping. They look like tabs and act the part too. Let’s add two such tasks aptly named "One" and "Two".
public class MainFrame extends JRibbonFrame {

  public static void main(String[] args) {

    SwingUtilities.invokeLater(new Runnable() {

      @Override
      public void run() {
        MainFrame frame = new MainFrame();
        frame.setDefaultCloseOperation(EXIT_ON_CLOSE);
        frame.pack();
        frame.setVisible(true);
        RibbonTask task1 = new RibbonTask("One");
        RibbonTask task2 = new RibbonTask("Two");
        frame.getRibbon().addTask(task1);
        frame.getRibbon().addTask(task2);
      }
    });
  }
}
Notice the getRibbon() method on the JRibbonFrame.
It is the reference on the ribbon bar.
Also notice that the addTask() method accepts a task but also a varargs of JRibbonBand.
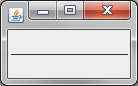
And if you launch the above code, it will fail miserably with the following error:
Exception in thread "AWT-EventQueue-0" java.lang.IllegalArgumentException: Cannot have empty ribbon task
  at org.jvnet.flamingo.ribbon.RibbonTask.<init>(RibbonTask.java:85)
  at MainFrame$1.run(MainFrame.java:37)
  at java.awt.event.InvocationEvent.dispatch(InvocationEvent.java:209)
  at java.awt.EventQueue.dispatchEvent(EventQueue.java:597)
  at java.awt.EventDispatchThread.pumpOneEventForFilters(EventDispatchThread.java:269)
  at java.awt.EventDispatchThread.pumpEventsForFilter(EventDispatchThread.java:184)
  at java.awt.EventDispatchThread.pumpEventsForHierarchy(EventDispatchThread.java:174)
  at java.awt.EventDispatchThread.pumpEvents(EventDispatchThread.java:169)
  at java.awt.EventDispatchThread.pumpEvents(EventDispatchThread.java:161)
  at java.awt.EventDispatchThread.run(EventDispatchThread.java:122)
Adding bands
To satisfy our Flamingo friend, let’s add a ribbon band to each task.
The constructor of JRibbonBand takes two argument, the label and an instance of a previously unknown class, ResizableIcon.
It will be seen in detail in the next section.
As for now, if you just create the RibbonTask with a reference to the JRibbonBand and launch the application, you will get such an error:
Exception in thread "AWT-EventQueue-0" java.lang.IllegalStateException: Inconsistent preferred widths
Ribbon band 'Hello has the following resize policies
  org.jvnet.flamingo.ribbon.resize.CoreRibbonResizePolicies$None with preferred width -4
  org.jvnet.flamingo.ribbon.resize.CoreRibbonResizePolicies$Low2Mid with preferred width -4
  org.jvnet.flamingo.ribbon.resize.CoreRibbonResizePolicies$Mid2Mid with preferred width -4
  org.jvnet.flamingo.ribbon.resize.CoreRibbonResizePolicies$Mirror with preferred width -4
  org.jvnet.flamingo.ribbon.resize.CoreRibbonResizePolicies$Mid2Low with preferred width -4
  org.jvnet.flamingo.ribbon.resize.CoreRibbonResizePolicies$High2Mid with preferred width -4
  org.jvnet.flamingo.ribbon.resize.IconRibbonBandResizePolicy with preferred width 42
Remember that bands are resizable? Flamingo needs information on how to do it. Before initial display, it will check that those policies are consistent. By default, they are not and this is the reason why it complains: Flamingo requires you to have at least the iconified policy that must be in the last place. In most cases, however, you’ll want to have at least a normal display in the policies list.
Let’s modify the code to do it:
JRibbonBand band1 = new JRibbonBand("Hello", null);
JRibbonBand band2 = new JRibbonBand("world!", null);
band1.setResizePolicies((List) Arrays.asList(new IconRibbonBandResizePolicy(band1.getControlPanel())));
band2.setResizePolicies((List) Arrays.asList(new IconRibbonBandResizePolicy(band1.getControlPanel())));
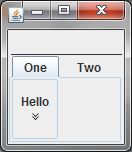
RibbonTask task1 = new RibbonTask("One", band1);
RibbonTask task2 = new RibbonTask("Two", band2);The previous code let us at least see something:
Adding buttons (at last!)
Even if the previous compiles and runs, it still holds no interest. Now is the time to add some buttons!
JCommandButton button1 = new JCommandButton("Square", null);
JCommandButton button2 = new JCommandButton("Circle", null);
JCommandButton button3 = new JCommandButton("Triangle", null);
JCommandButton button4 = new JCommandButton("Star", null);
band1.addCommandButton(button1, TOP);
band1.addCommandButton(button2, MEDIUM);
band1.addCommandButton(button3, MEDIUM);
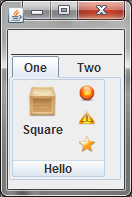
band1.addCommandButton(button4, MEDIUM);Too bad there’s no result! Where are our buttons? Well, they are well hidden. Remember the resize policies? There’s only one, the iconified one and its goal is only to display the iconified state. Just update the policies line with the code:
band1.setResizePolicies((List) Arrays.asList(
  new CoreRibbonResizePolicies.None(band1.getControlPanel()),
  new IconRibbonBandResizePolicy(band1.getControlPanel())));
The result looks the same at first, but when you resize the frame, it looks like this:
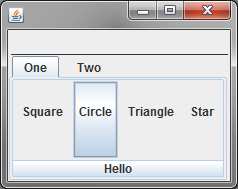
Even if it’s visually not very attractive, it looks much better than before. We see the taks, the name of the band and the labels on our four buttons.
Resizable icons
The JCommandButton constructor has 2 parameters:
one for the label, the other for a special Flamingo class, the ResizableIcon.
Since Flamingo is all about displaying the same button in different sizes, that’s no surprise.
Resizable icons can be constructed from Image, ico resources or even SVG.
Let’s add an utility method to our frame, and spice up our UI:
public static ResizableIcon getResizableIconFromResource(String resource) {
return ImageWrapperResizableIcon.getIcon(MainFrame.class.getClassLoader().getResource(resource), new Dimension(48, 48));
}
...
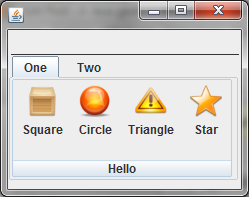
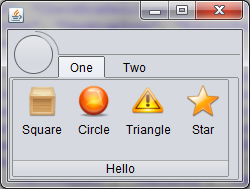
JCommandButton button1 = new JCommandButton("Square", getResizableIconFromResource("path"));
JCommandButton button2 = new JCommandButton("Circle", getResizableIconFromResource("to"));
JCommandButton button3 = new JCommandButton("Triangle", getResizableIconFromResource("the"));
JCommandButton button4 = new JCommandButton("Star", getResizableIconFromResource("resource"));
band1.addCommandButton(button1, TOP);
band1.addCommandButton(button2, MEDIUM);
band1.addCommandButton(button3, MEDIUM);
band1.addCommandButton(button4, MEDIUM);This is somewhat more satisfying:
![]()
Choosing policies
Now we’re ready to tackle Flamingo’s core business, resizing management. If you have Office, and played with it, you saw that the resizing policies are very rich. And we also saw previously that with only two meager policies, we can either see the iconified display or the full display.
Let’s see how we could go further.
You probably noticed that the addCommandButton() of JRibbonBand has 2 parameters: the button to add and a priority.
It is this priority and the policy that Flamingo use to choose how to display the band.
Priorities are the following: TOP, MEDIUM and LOW.
Policies are:
| Policy | Description |
|---|---|
|
Command buttons will be represented in the |
|
Command buttons that have |
|
Command buttons that have |
|
Command buttons that have |
|
Command buttons that have |
|
Command buttons that have |
|
Command buttons will be represented in the priority they were assigned to |
|
Command buttons will be not represented. The entire band will be represented by a command button that when pressed will show a popup of the unconstrained band. |
Now, you have all elements to let you decide which policies to apply.
There’s one rule though:
when setting policies, the width of the band must get lower and lower the higher the index of the policy (and it must end with the IconRibbonBandResizePolicy) let you’ll get a nasty IllegalStateException: Inconsistent preferred widths (see above).
Let’s apply some policies to our band:
band1.setResizePolicies((List) Arrays.asList(
  new CoreRibbonResizePolicies.None(band1.getControlPanel()),
  new CoreRibbonResizePolicies.Mirror(band1.getControlPanel()),
  new CoreRibbonResizePolicies.Mid2Low(band1.getControlPanel()),
  new CoreRibbonResizePolicies.High2Low(band1.getControlPanel()),
  new IconRibbonBandResizePolicy(band1.getControlPanel())));
This will get us the following result:
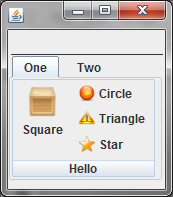
| There won’t be any iconified state in my example since the band does not compete for space with another one. |
More features
Flamingo’s ribbon feature let you also:
- add standard Swing components to the ribbon
- add a menu on the top left corner
- integration with standard Look and Feels
- tight integration with Substance L&F
Those are also undocumented but are much easier to understand on your own.
It also has other features:
- Breadcrumb bar
- Command button strips and panels
Conclusion
Flamingo is a nice and powerful product, hindered by a big lack of documentation. I hope this article will go one step toward documenting it.
Here are the sources for this article in Eclipse/Maven format.
— Edit on 28th june 2010: feedback from Kirill —
- Version 5.0 no longer requires "iconified" policy to be present
- I strongly suggest not using image-based icons.
The recommended way is to transcode SVG files to Java2D-based classes with an offline process and use those classes at runtime.
This is what i do in the
BasicCheckRibbonclass.