

I like GitLab a lot. Yet, there’s no denying that GitHub has become the de facto standard to host Open Source projects. With GitHub Actions, it’s now possible to implement entire Continuous Integration pipelines without leaving GitHub.
In this post, I’d like to highlight how to release Maven artifacts using GitHub Actions.
Maven prerequisites
Before creating the CI pipeline - and running it, it’s necessary to configure the underlying Maven project.
A quick Maven primer
Maven is a large subject, that deserves more than this post can cover. But to understand the rest of this post, here are the most important parts.
Maven references projects by a triplet of unique coordinates composed of:
- A group ID
- An artifact ID
- A version
For example, the sample project’s coordinates are:
<groupId>ch.frankel.blog.renamer</groupId>
<artifactId>renamer-swing</artifactId>
<version>1.0-SNAPSHOT</version>
The output of a project is an artifact e.g. a JAR.
You can append the version of a project with -SNAPSHOT.
A snapshot version is under development;
a non-snapshot one, a regular release.
Some projects provide milestones, and/or release candidates before the final release.
In that case, Maven doesn’t natively offer a naming scheme for that.
For example, the Spring framework append .Mx, .RCx, and .RELEASE to the version.
they are not considered snapshots.
Release management
The Maven Release plugin manages the release process.
It provides two complementary goals, prepare and perform.
They do the following:
- Prepare
-
- Change the version in the POM from
x-SNAPSHOTto a new version - Transform the SCM information in the POM to include the final destination of the tag
- Commit the modified POM
- Tag the code in the SCM with a version name
- Bump the version in the POM to a new value
y-SNAPSHOT - Commit the modified POM
- Change the version in the POM from
- Perform
-
- Checkout from an SCM URL with optional tag
- Run the predefined Maven
deploygoal
For the required SCM information, the Maven POM offers a dedicated section to configure it. With our sample, it looks like:
<scm>
  <developerConnection>scm:git:https://github.com/ajavageek/renamer-swing.git</developerConnection>
</scm>
Authentication
The above snippet allows for different protocols:
git, http, https, ssh, or even file.
Authenticating with the git protocol requires a SSH key.
In the context of a CI pipeline, this is not desirable.
Thus, the above configuration snippet needs to use the http protocol.
This requires credentials in the form of a user/password pair.
Maven decouples project-specific data, from data shared across projects, such as security-related data.
The POM is responsible for the former, while the $HOME/.m2/settings.xml file holds the latter.
Each credentials pair requires a unique identifier.
<settings>
  <servers>
    <server>
      <id>github</id>                     (1)
      <username>my_usernam</username>
      <password>my_password</password>
    </server>
  </servers>
</settings>| 1 | Unique identifier |
To configure a Maven project to use a specific server, add a property with the project.scm.id key and the server’s id as the value.
<properties>
  <project.scm.id>github</project.scm.id>  (1)
</properties>| 1 | The project will use the github server configured un the settings file |
Distribution management
Maven authors designed Maven around a plugin architecture.
By itself, Maven just provides a build lifecycle, with a set of build phases.
The Maven engine calls each phase in order;
the cycle cannot advance to a later phase without having run through earlier phases.
For example, phases in the build lifecycle include compile, test, integration-test, package and deploy.
test cannot run without first running compile.
You can bind plugin goals to a specific phase.
By default, Maven binds a couple of goals.
For example, the package phase binds the maven-jar-plugin:jar goal.
Running mvn package will execute all goals bounds to all phases in order, up until package.
Calling the release:perform goal launches a Maven fork that runs the deploy phase.
By default, Maven binds the deploy:deploy goal of the Maven Deploy plugin to deploy.
This implies Maven has run goals bound to the package phase before.
For this reason, the build artifact is available when deploy starts.
Deploying means that Maven will push the artifact to a registry that needs to be explicitly configured.
In the context of this project, the artifact is a JAR, and the registry, GitHub. This translates into the following configuration snippet:
<distributionManagement>
  <repository>
    <id>github</id>
    <name>GitHub</name>
    <url>https://maven.pkg.github.com/ajavageek/renamer-swing</url>  (1)
  </repository>
</distributionManagement>| 1 | The root of GitHub registry is at https://maven.pkg.github.com |
The Maven command
The build should execute both the release:prepare and release:perform goals.
By default, release:prepare is interactive:
the plugin asks for the release version, as well as for the new snapshot version.
For an automated build, this is not possible.
It’s possible to run Maven in batch mode by using the command-line -B flag.
In that case, the plugin automatically infers both release and snapshot versions.
The command becomes:
mvn -B release:prepare release:performThe Maven wrapper
The final preparation step is to become fully independent of the Maven version.
In the future, the specific Maven version used to build the project might not be available anymore.
Versions that are available at that time might not be compatible with it.
For this reason, a Maven plugin provides a wrapper.
A wrapper self-executable JAR that can kickstart a specific version of the mvn tool regardless of the environment.
To create such a wrapper is straightforward:
mvn -N io.takari:maven:wrapperThis creates a couple of files, including a .mvn folder, inside the project.
You need to add all those files in the SCM.
From this point on, instead of using the mvn command, you should use the mvnw script located at the root of the project.
The build doesn’t require a local Maven installation anymore.
Building on GitHub
Now that we configured the POM, it’s time to integrate Maven in the GitHub build.
The idea is to have two branches:
master and release.
Every time a commit happens on the release branch, GitHub should create a new release and a new deployment.
At a later time, a manual step can then rebase/merge the master and release branches.
|
Alternative flow
Remember that the |
GitHub Actions introduction
Existing CI tools make use of a configuration file stored at the root of the repository:
| Tool | File |
|---|---|
Jenkins |
|
GitLab |
|
Travis CI |
|
GitHub Actions follows a similar approach, with two important differences:
- The project can make use of more than one build file - known as a workflow
- They must be located in a
$PROJECT_ROOT/.github/workflowsfolder
Build steps
The first step is obviously to checkout the repo:
- name: Checkout project
  uses: actions/checkout@v2
The next step is to install a JDK:
- name: Setup Java JDK
  uses: actions/[email protected]
  with:
    java-version: 14                    (1)
server-id: github (2)| 1 | Install Java 14 |
| 2 | Create a Maven settings.xml file, and a server configured with the following value:
|
|
Be careful!
I lost quite some time trying to find an action that creates the |
Because release:prepare actually commit, it’s necessary to configure the user and email to use:
- name: Configure Git user
  run: |
    git config user.email "[email protected]"
    git config user.name "GitHub Actions"
The last step is actually the most straightforward. Just run the Maven command from above.
- name: Publish JAR
  run: ./mvnw -B release:prepare release:perform
  env:
GITHUB_TOKEN: ${{ secrets.GITHUB_TOKEN }} (1)| 1 | release:prepare uses the credentials found in the settings.xml file, but GitHub Actions makes deploy:deploy use the GITHUB_TOKEN environment variable value. |
Proof-Of-Concept
When the master branch is ready for a release, just push it to the release branch:
git push origin master:releaseThis triggers the workflow.
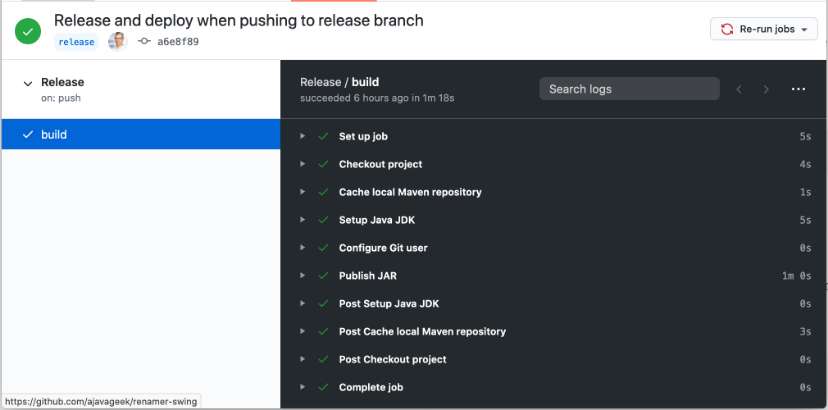
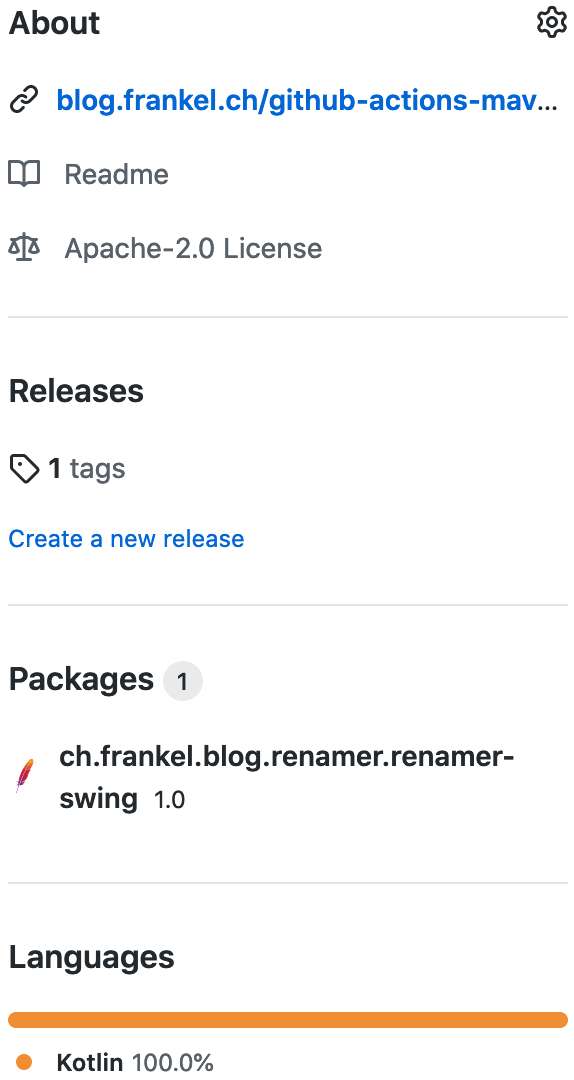
The successful run of the workflow has created a release, a tag, and a deployment:
The final Git graph looks like this:

Conclusion
Managing Maven releases with GitHub Actions is not trivial. Yet, it requires just a bit of experience to make it work. It’s my hope that this post can help Maven users leverage the full power of GitHub Actions by providing this experience.
The complete source code for this post can be found on GitHub.