

I’ve already written about the excellent monitoring features available in Spring Boot.
In Spring Boot 2.0, there has been a major rewrite regarding how the /metrics HTTP endpoint is designed.
Most importantly, there’s now a dedicated project regarding metrics, called Micrometer.
In this post, I’ll describe how to migrate an app from Spring Boot 1.5 to Micrometer.
It’s possible to use Micrometer in Spring Boot 1.5 by using the micrometer-spring-legacy dependency.
More information can be found in the dedicated documentation.
|
Metrics dimensionality
Before Spring Boot 2.0, metrics were single values, and organized in a tree-like way.
Those are best described as hierarchical metrics.
This is an example of the /metrics endpoint output:
{
  "mem" : 562688,
  "mem.free" : 328492,
  "processors" : 8,
  "uptime" : 26897,
  "instance.uptime" : 18974,
  "heap.committed" : 562688,
  "heap.init" : 131072,
  "heap.used" : 234195,
  "heap" : 1864192,
  "threads.peak" : 20,
  "threads.daemon" : 17,
  "threads" : 19,
  "classes" : 9440,
  "classes.loaded" : 9443,
  "classes.unloaded" : 3,
  "gc.ps_scavenge.count" : 16,
  "gc.ps_scavenge.time" : 104,
  "gc.ps_marksweep.count" : 2,
  "gc.ps_marksweep.time" : 152
}
Notice that each metric is a key/value pair. Metric names use the dot notation, and there’s one single value - they only have one single dimension. The good side of hierarchical metrics is that displaying them on a page is pretty straightforward.
Another way to organize metrics is via tags. Also, metrics might not have one single value but different values, like minimum, maximum, mean, etc. Hence, they are named dimensional metrics.
This is an output sample of the new /metrics endpoint in Spring Boot 2.0:
{
    "names": [
        "http.server.requests",
        "jvm.buffer.memory.used",
        "jvm.memory.committed",
        "jvm.memory.used",
        "jdbc.connections.min",
        "system.cpu.count",
        "jvm.memory.max",
        "jdbc.connections.active",
        "process.files.max",
        "jvm.threads.daemon",
        "process.start.time",
        "jvm.gc.live.data.size",
        "process.files.open",
        "jvm.gc.pause",
        "jvm.buffer.total.capacity",
        "jvm.threads.live",
        "jvm.classes.loaded",
        "jvm.classes.unloaded",
        "jvm.gc.memory.promoted",
        "jvm.gc.memory.allocated",
        "jvm.gc.max.data.size",
        "jvm.buffer.count",
        "process.cpu.usage",
        "process.uptime",
        "system.load.average.1m",
        "jdbc.connections.max",
        "system.cpu.usage",
        "jvm.threads.peak"
    ]
}
Obviously, displaying dimensional metric values is not as straightforward as previously because of their multiple values. In fact, it depends on the nature of the target display system.
Displaying metrics via HTTP
To access a specific metric, one need to append the metric’s name to the path, e.g. /metrics/http.server.requests.
The output looks like the following:
{
    "name": "http.server.requests",
    "measurements": [
        {
            "statistic": "COUNT",
            "value": 36
        },
        {
            "statistic": "TOTAL_TIME",
            "value": 0.784767583
        },
        {
            "statistic": "MAX",
            "value": 0
        }
    ],
    "availableTags": [
        {
            "tag": "exception",
            "values": [
                "None",
                "RuntimeException"
            ]
        },
        {
            "tag": "method",
            "values": [
                "GET"
            ]
        },
        {
            "tag": "uri",
            "values": [
                "/manage/beans",
                "/manage/env",
                "NOT_FOUND",
                "/owners/find",
                "/manage/loggers",
                "/**",
                "/manage/metrics/{requiredMetricName}",
                "/oups",
                "/manage/health",
                "root",
                "/webjars/**",
                "/vets.html",
                "/manage/metrics"
            ]
        },
        {
            "tag": "status",
            "values": [
                "404",
                "500",
                "200"
            ]
        }
    ]
}
In the example above, dimensions consists of:
- exception
- method
- uri
- status
For example, the count value is an aggregate of the count values of all URIs.
To restrict the metric to a specific tag, just append the tag query parameter with the key:value pattern e.g. ?tag=uri:root.
The output now becomes:
{
    "name": "http.server.requests",
    "measurements": [
        {
            "statistic": "COUNT",
            "value": 1
        },
        {
            "statistic": "TOTAL_TIME",
            "value": 0.387389895
        },
        {
            "statistic": "MAX",
            "value": 0
        }
    ],
    "availableTags": [
        {
            "tag": "exception",
            "values": [
                "None"
            ]
        },
        {
            "tag": "method",
            "values": [
                "GET"
            ]
        },
        {
            "tag": "status",
            "values": [
                "200"
            ]
        }
    ]
}
Now, the count value displayed is the one related only to the root URI.
Additionally, it becomes apparent that the single request to the root was a GET and returned a 200 HTTP response code.
Displaying metrics in JConsole
Displaying hierarchical metrics in the JConsole was just a matter of locating the right leaf in the tree. Displaying dimensional metrics is much harder, as it requires passing parameters, including the filter tags.
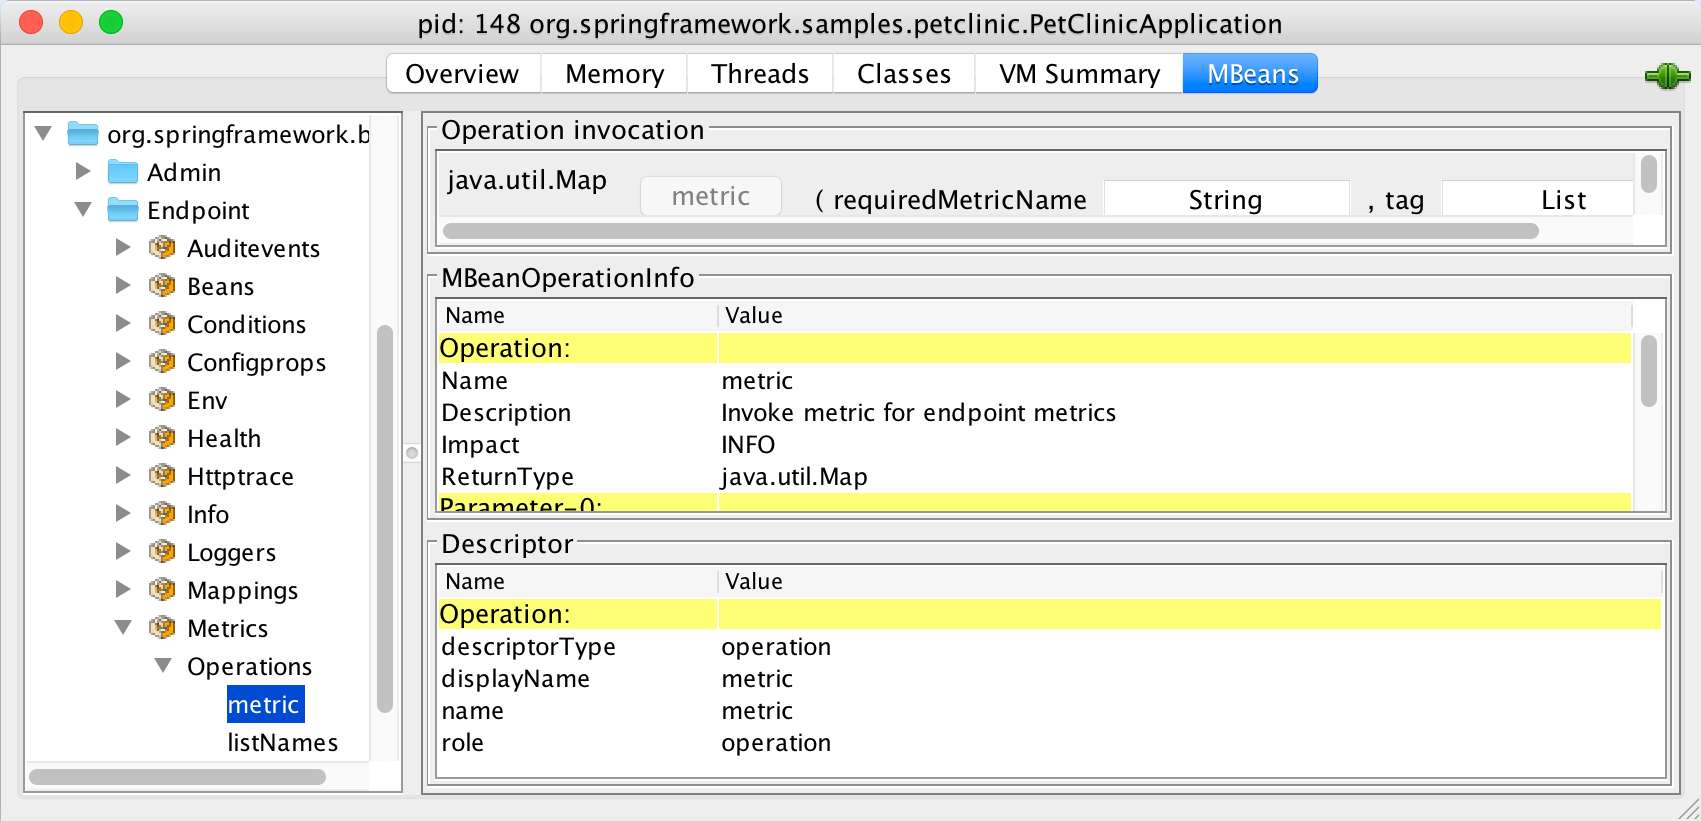
There’s no way to actually call the method, as the second parameter tag is of type List.
JConsole has become read-only!
Displaying metrics in Grafana
The last backend I used in my previous post on Spring Boot 1.5 was Grafana.
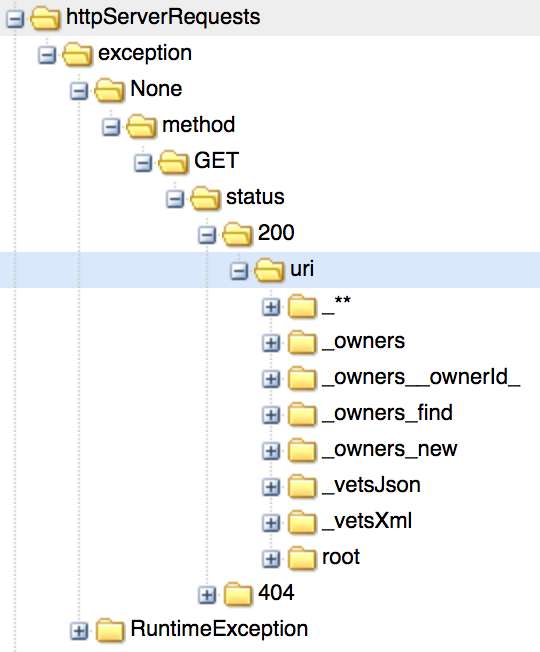
The interesting challenge with Grafana is that it’s meant to display hierarchical metrics, such as counter.status.200.root.
To display dimensional metrics, a mapping between the dimensional world and the hierarchical world is required.
By default, Spring Boot handles it in a very straightforward way:
it just adds every tag’s name and value to the metric’s name.
For example, the above http.server.requests metric translates into as many metric combinations as possible based on the httpServerRequests.exception.<value>.method.<value>.status.<value>.uri.<value> pattern.
|
Root namespace pollution
The default configuration will create all metrics at the root, polluting the root namespace. Property-based configuration to move metrics under a dedicated prefix seems to be buggy at the time of this writing. I found the following configuration to be working: |
Conclusion
Migrating metrics from Spring Boot 1.5 to 2.0 one-on-one is not a bed of roses. Besides, keeping things are they are doesn’t allow to benefit from dimensional metrics. However, it’s a good first step to jump on the Spring Boot 2.0 train.